
Saturday, June 25, 2011

Queencliff Freshwater Tunnel
If you ever visit Manly, on the far side of the beach, there is an ancient tunnel to explore.
It is a secret passage between Manly (Queenscliff) and Freshwater beaches. It is easy to get to from the Manly side, but it is a real adventure to make it all the way to Freshwater beach.
Suitable for my mum, Louka and anyone really. The warning sign is just about falling rocks.

The tunnel entrance...

The reward, it is this tunnel, it is suprisingly long and opens up to a sun filled ledge - unfortunately there are no seats.

It is a secret passage between Manly (Queenscliff) and Freshwater beaches. It is easy to get to from the Manly side, but it is a real adventure to make it all the way to Freshwater beach.
Suitable for my mum, Louka and anyone really. The warning sign is just about falling rocks.

The tunnel entrance...

The reward, it is this tunnel, it is suprisingly long and opens up to a sun filled ledge - unfortunately there are no seats.

Finished Driveway
A picture of the finished driveway. One of the tracks is 30cm shorter - thanks to the burst pipe. It is all seeded and ready to grow. Also the moved hose. In a much better position.


DIY Potting Mix
Potting mix is expensive, so why not mix your own.
I bought yet another cubic metre of compost from the recycling centre $35. They used a massive front end loader to load it. It took them 4 "bucket loads" to fill my ute tray simply because the bucket was twice the width of my tray and they didn't want to spill anything.
Anyway, with my trusty cement mixer, I sure made quick work mixing the compost, sand and a bit of ammonia sulfate. It mixed very quickly and very well - a minute per wheel barrow load.
I found that you can no longer get ammonia nitrate nor potasium nitrate (thanks to alkada and a paranoid government).

I lowered the blocks just so there is a level pathway beside the driveway

Forming up fro the concrete around the stormwater pits...

The finish product, complete with native violets

I bought yet another cubic metre of compost from the recycling centre $35. They used a massive front end loader to load it. It took them 4 "bucket loads" to fill my ute tray simply because the bucket was twice the width of my tray and they didn't want to spill anything.
Anyway, with my trusty cement mixer, I sure made quick work mixing the compost, sand and a bit of ammonia sulfate. It mixed very quickly and very well - a minute per wheel barrow load.
I found that you can no longer get ammonia nitrate nor potasium nitrate (thanks to alkada and a paranoid government).

I lowered the blocks just so there is a level pathway beside the driveway

Forming up fro the concrete around the stormwater pits...

The finish product, complete with native violets

Thursday, June 16, 2011
Leaf Tailed Gecko Poetry
Our friendly leaf tailed gecko is pictured here. On my spade. Rescued from a pit trap. A few hours later, it disappeared. End.


Wednesday, June 15, 2011
Burst Water Pipe
I managed to put a star picket through the water main - unfortunately not my side of the meter. I got some plumbers out and they installed a dodgy clamp that was really only meant for gal pipes. It still dribbled a little bit.
A week later after the concrete set and being one not to miss a DIY opportunity, I made a pipe crusher out of some timber and M12 bolts. It did kind of work - ie reduce the flow a bit more.
When the plumber arrived 10 minutes later at 7am to freeze and properly repair the pipe, he undid the meter and we bent the pipe over and further reduced the flow - still trickling. So it was 5 pound hammer time bashing the pipe sealing it even more.
In addition to fixing the pipe, I got him to install a couple of gas heater outlets.

Neat pipe crushing job...

No so neat pipe bent over and bashed job. You can also see the star picket damage...

A week later after the concrete set and being one not to miss a DIY opportunity, I made a pipe crusher out of some timber and M12 bolts. It did kind of work - ie reduce the flow a bit more.
When the plumber arrived 10 minutes later at 7am to freeze and properly repair the pipe, he undid the meter and we bent the pipe over and further reduced the flow - still trickling. So it was 5 pound hammer time bashing the pipe sealing it even more.
In addition to fixing the pipe, I got him to install a couple of gas heater outlets.

Neat pipe crushing job...

No so neat pipe bent over and bashed job. You can also see the star picket damage...

Monday, June 13, 2011
New improved temp controlled fridge
After working out I can use the MTC-3000 for a temperature controller for both cooling and heating, I fitted it as an upgrade to my beer brewing fridge.
In my previous blog entry a converted a whole pile of giberious into a fancy state diagram just to really understand how it works.
The MTC-3000 (which I bought cheap off the net) is really only designed for a industrial fridge. However, it does support a frost free mode (ie auto defrost). I hooked up the defrost to the power point - which in turn powers the mortein 10Watt bug killer which I use as a heater. The fridge is set to turn on at 22 degrees and turn off at 20. The heater (defrost) is set to 18 degrees (or lower). But because it is a defrost controller it I've configured it to turn it on for 30 minutes on a hour cycle while the temp is below 18 degrees.

You can see I actually ripped out the fridge's thermostat. I'm not too sure how much I would be able to sell my modified fridge on the net for. The power point is in a bad position - I'll move it tomorrow.

In my previous blog entry a converted a whole pile of giberious into a fancy state diagram just to really understand how it works.
The MTC-3000 (which I bought cheap off the net) is really only designed for a industrial fridge. However, it does support a frost free mode (ie auto defrost). I hooked up the defrost to the power point - which in turn powers the mortein 10Watt bug killer which I use as a heater. The fridge is set to turn on at 22 degrees and turn off at 20. The heater (defrost) is set to 18 degrees (or lower). But because it is a defrost controller it I've configured it to turn it on for 30 minutes on a hour cycle while the temp is below 18 degrees.

You can see I actually ripped out the fridge's thermostat. I'm not too sure how much I would be able to sell my modified fridge on the net for. The power point is in a bad position - I'll move it tomorrow.

Saturday, June 11, 2011

Thursday, June 9, 2011
Temperature Controlled Cupboard
Here is the temperature controlled cupboard for Liz's sourdough starters....It kicks in at 25degreesC and turns off at 22.


Sunday, May 29, 2011
Driveway 4
In go the soil and cement footings. Half a bag of cement to 16 shovels of soil.

Towards the end of the pour it started to rain, up go the tarps...I sent Liz off to get some more cement. This is how much I had left to go. Fortunately she just got back just as I finished the last pour.

This is some of the sandy clay that is very deep in the ground.
Towards the end of the pour it started to rain, up go the tarps...I sent Liz off to get some more cement. This is how much I had left to go. Fortunately she just got back just as I finished the last pour.


Friday, May 27, 2011
Drive Way 3
I've just formed up the first track of the second drive way. This one will be 800m wide rather than 600mm. This should make it easier to park.

I used packers sometimes to make sure the timber position is just right.
I had to make a bridge so I can actually get the concrete where it needs to be.
Instead of encounter heaps of tree roots (I just had a few), I had to remove a thin layer of concrete that was left over from the building.


I used packers sometimes to make sure the timber position is just right.
I had to make a bridge so I can actually get the concrete where it needs to be.
Instead of encounter heaps of tree roots (I just had a few), I had to remove a thin layer of concrete that was left over from the building.

Sunday, May 15, 2011
Cement Driveway 2
Another day and another track in my drive way. My soil and sand mix seems to be working well. I get many questions in my unorthodox approach, but it all makes sense to me.
Full of over confidence, it was a late start and a late finish - 6:00 by the time I could do the broom finish.

I went for the full bag mix with the cement mixer. It strained and groaned and even stopped when I went to unload the mix into the wheel barrow.
Here are some pictures of the soil and cement mix - much like mortar.
I got Liz go go to Bunnings to get some ordinary cement. The frigging idiots there pointed her to Builder Cement (has fly ash for more workability), but I did not want that. I wanted a stiff mix with low slump. I really got annoyed with Bunnings poor customer service and Liz had to go back and then they gave her some cheek about what the difference is.


Full of over confidence, it was a late start and a late finish - 6:00 by the time I could do the broom finish.

I went for the full bag mix with the cement mixer. It strained and groaned and even stopped when I went to unload the mix into the wheel barrow.
Here are some pictures of the soil and cement mix - much like mortar.
I got Liz go go to Bunnings to get some ordinary cement. The frigging idiots there pointed her to Builder Cement (has fly ash for more workability), but I did not want that. I wanted a stiff mix with low slump. I really got annoyed with Bunnings poor customer service and Liz had to go back and then they gave her some cheek about what the difference is.


Friday, May 13, 2011
Cement Drive Way
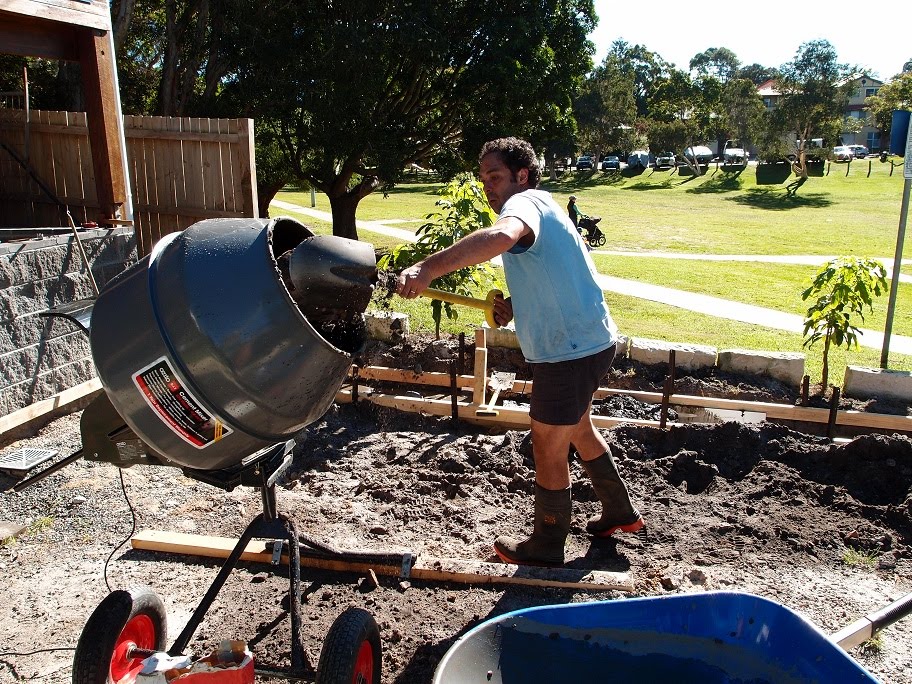
9 bags of cement later and track one of the cement driveway is done.
I first layed a bed of soil and cement and then laid the "real" concrete (100mm thick with some spare steel mesh). The real concrete consisted of soil, recycled aggregate and cement. I opted for a broom finish. The reason for this bed of soil cement is because I had to excavate to about 200mm to remove a lot of decaying roots. I could have simply compacted the ground or filled it with gravel, but it was just cheaper to use soil and cement.
Being a cold day, I didn't have any issues with the concrete going off too quickly.
The ozito cement mixer is gutless, you could hear it groan as it mixed. It didn't actually stop, but I'm sure it could have easily happened. I would not recommend the cement mixer for any serious work as it really slows down under load and like all Ozito stuff, it is under powered. The last thing you want to do is have to stand around waiting for the mixer to mix properly and worry about it breaking down. But for me, it was a good buy.
I also elected to stabilize it a bit more by fixing the bottom bar of the stand to a piece of 4*2 just to make sure in no way could it fall over.


I first layed a bed of soil and cement and then laid the "real" concrete (100mm thick with some spare steel mesh). The real concrete consisted of soil, recycled aggregate and cement. I opted for a broom finish. The reason for this bed of soil cement is because I had to excavate to about 200mm to remove a lot of decaying roots. I could have simply compacted the ground or filled it with gravel, but it was just cheaper to use soil and cement.
Being a cold day, I didn't have any issues with the concrete going off too quickly.
The ozito cement mixer is gutless, you could hear it groan as it mixed. It didn't actually stop, but I'm sure it could have easily happened. I would not recommend the cement mixer for any serious work as it really slows down under load and like all Ozito stuff, it is under powered. The last thing you want to do is have to stand around waiting for the mixer to mix properly and worry about it breaking down. But for me, it was a good buy.
I also elected to stabilize it a bit more by fixing the bottom bar of the stand to a piece of 4*2 just to make sure in no way could it fall over.


Sunday, May 8, 2011
cement mixer
Just bought a cement mixer. A Bunnings Special - Ozito 4.4 cuft 370W 125L OZCM44A.
The reasons why I like this one are as follows:
1) Light enough for me to load it onto my ute by myself.
2) Seems to just take up less space then the other models.
3) Big, good for mixing compost with dirt for the garden.
I bought floor stock and I did not have to assemble it myself. However, I wondered whether I could make it even lighter by taking the drum off and this is how I did it...
1) Remove the fan casing and fan.
2) Using multigrips, stop the motor from free wheeling

3) Make up a "jig" as can see below using some timber just so you can get a grip on the bowl. The timber inside the drum is flared to grip the drum between it and the outer piece.

4) The important bit, rotate the drum off the right way. And this would be counter clockwise - just like taking a lid off a jar.
5) I took the time to grease the thread just so it will be easier to remove the drum in the future.

The reasons why I like this one are as follows:
1) Light enough for me to load it onto my ute by myself.
2) Seems to just take up less space then the other models.
3) Big, good for mixing compost with dirt for the garden.
I bought floor stock and I did not have to assemble it myself. However, I wondered whether I could make it even lighter by taking the drum off and this is how I did it...
1) Remove the fan casing and fan.
2) Using multigrips, stop the motor from free wheeling

3) Make up a "jig" as can see below using some timber just so you can get a grip on the bowl. The timber inside the drum is flared to grip the drum between it and the outer piece.

4) The important bit, rotate the drum off the right way. And this would be counter clockwise - just like taking a lid off a jar.
5) I took the time to grease the thread just so it will be easier to remove the drum in the future.

Sunday, May 1, 2011
Stairs now open for business
Now that shakey is not here, it is safe to open the stairs. I even put in a poll for that extra bit of safety. I can send Louka to the dungeon without going out side ;).


Tuesday, April 12, 2011
New Letter Box
A letter box upgrade has just been completed ;) The mail holding capacity has increased to huge. The old meter box was recycled. It is like a software upgrade. On paper it looks better, but sometimes you think it was a mistake ;) 

Friday, March 18, 2011
stairs finished
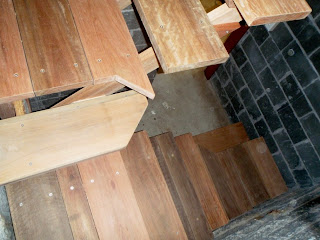
Ok, finally completed the stairs. They feel good, solid and not really wobbly. I can't imagine a better set give the contraints. No hand rail yet, kind of does not seem necessary.
I've kind of made provision for a hand rail, but that involved more design and effort.


I've kind of made provision for a hand rail, but that involved more design and effort.


Sunday, March 13, 2011

Saturday, March 12, 2011
Stairs with a few steps
As you can see, three and half steps added. They feel good. Nice and solid F27 hardwood.


Sunday, March 6, 2011


Subscribe to:
Posts (Atom)